Typical! I’ve always been late to the newest ‘knitting craze’, be it for double-knitting, for fair-isle, for brioche stitch (which I still have yet to master), for modular knitting… and for the love of Stephen West designs!
In this case, I was late to the Lopi party! More importantly, Icelandic sweaters. Lopi by Istex is the standard yarn used for such projects and my local yarn store: www.gilliangladrag.co.uk has been stocking various Lopi yarns in a beautiful range of colours!
I found this pattern in the Lopi Book No. 34 – called “Garri” by Védís Jónsdóttir.

I wanted to turn this sweater into a zip-up cardi and the only way to do that would be to work it in the round then steek it down the middle. Most Icelandic yoke sweaters are worked in the round anyway, but from the bottom-up – a new experience for me. I always choose top-down, if I can help it.
My Colours:
A – 86 Beige (main colour)
A (alt) – 0051 White – to be used as flashes of colour in the colourwork.
B – 9964 Yellow
C – 9972 Ecru
February 10, 2017: Quit stalling and get on wivvit!!
OK…, having studied the pattern extensively, having swatched and then re-swatched a few test pieces, I came to the conclusion that this sweater pattern was not going to work for me. It is a man’s sweater after all and for some reason the hem measurement is unbelievably narrow, I wondered if it would even fit my husband!
I didn’t trust the pattern’s tension either. My gauge was way off! This meant that I would not only have to go up 2 needle sizes, but I’d have to follow size XL to make sense of the numbers. I was not comfortable with following the pattern like this, but I really did like the design. I took the decision to reverse-engineer it by working it from the top down. I was going to modify it by making it into a zip-up cardi anyway, but there was going to be some obvious changes to the Icelandic yoke design.
Gah! I’ll just make it up as I go along!
February 20, 2017: I’m on the right track – yay!
Well, who’d have thought that reversing an Icelandic yoke chart would be so easy? I measured my neck circumference and added about 2” of ease. This gave me approx. 65 sts. A great deal of jiggery-pokery was required to make sure the repeat patterns started and ended at the right place – plus, I had to remember that I’d allowed an extra 5 sts in the centre front as my steeking strip.

Where the pattern showed decreases, I replaced them with increases using KFB. By getting the difficult part of the construction nailed down first, it means that the rest will be so much easier. Somehow, by doing it this way, it all made sense. I can’t see why more Icelandic sweaters are not made this way.
March 1, 2017: Looking OK so far, but…
…my tension had gone into ‘ultra-murderous’ mode! The plain stockinette body is looking a little bit small for my liking. This was fine if I wanted it to be more fitted at the waist, but I’ve got no ‘waist’ to speak of, so accentuating a flat panel was not going to work for me! I was thinking I could expand this area when I come to block it. But if not, then I’d have to cut out the stockinette portion and re-knit it, then graft the bottom bit to the colourwork section…. bleh?! (sigh!) Yes, sometimes it seems like I do like to make my life difficult!

March 5, 2017: Gulp!
I can see why many people don’t bother knitting ‘on the hoof’ like this because it can be a minefield of errors and pitfalls! In this case my extremely tight tension had lost me about 1.25 inches in the body circumference. In addition to that, I was a little too generous with the sleeve allowance, which may be the main reason why the body circ was tighter than expected.
I am an inventor if nothing else, so I’m bound to find a solution… and this was it: Thankfully the sleeve allowance was not a major problem, so I would simply do a few rapid decreases to get around that. To make up for the loss in body circ however, I picked up and knitted stitches for the front band ribbing and made them a bit longer than I had planned to. The zip would be attached to that, so I would have made up for the lost circ at the front of the body… phew!

March 8, 2017: The home straight
My sleeves (at upper arm) were going to be larger than expected so I ripped back and tackled this by doing a few rapid decreases and used 6.5mm needles instead of 7mm as planned. This seemed to work out well. For the lower sleeve, I mirrored the same zigzag design.

Blocking: After weaving in all the ends, I put it in a lukewarm bath to soak. I added a bit of woolwash and hair conditioner, a protein-rich type that should only be used for treatments and should only be used sparingly…. I may have poured in a little too much because the fibres were blooming all over the place! Got to admit it though, the fabric is REALLY SOFT now! I left it to dry directly on the mannequin so that if it DID shrink, it wouldn’t get any smaller.
March 13, 2017: Let’s cut that sh!t up!!
Cutting the steek wasn’t as scary as it seemed. I didn’t need to reinforce the steek first either, because the yarn bloomed like a crazy thing, there’s no chance in the world of any of those stitches coming loose!

After steeking I hand sewed the flaps to the inside using a tapestry needle and the main colour yarn. The zip was hand sewn to the ribbing – a slow process, but much better and neater than machine-stitching it in place.

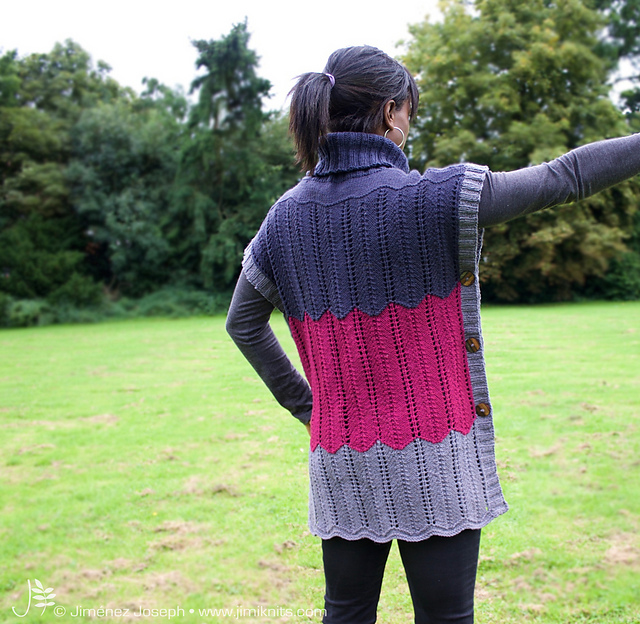
The Fit
I love it! It fits my frame surprisingly well. I suspect that having dried it directly on the mannequin helped to create the perfect fit. I even expected the yarn to itch me madly, but it doesn’t irritate me at all. The fabric is warm and firm… perhaps a bit too fluffy (due to my over-zealous handling of hair conditioner!), but I’m sure that it will calm down once I’ve worn it a few times.